- Part 1: How to Play Apple Music on Chromebook with Apple Music Web Player
- Part 2: How to Play Apple Music on Chromebook with Apple Music Android App
- Part 3: Play Apple Music Songs on Chromebook via USB Drive or Google Drive
- FAQ on Playing Apple Music on Chromebook
How to Play Apple Music on Chromebook with Apple Music Web Player
The Apple Music web player is the simplest way to stream Apple Music on any Chromebook because it runs in Chrome without installing apps. It requires a stable internet connection and an active Apple Music subscription, but it works on most Chrome OS devices instantly — no Play Store or Android app needed. This option is ideal for students, office machines, or any Chromebook that doesn’t support Android apps.
Step 1: On your Chromebook, launch Google Chrome browser.
Step 2: In the address bar, enter the URL of Apple Music web player https://music.apple.com/us/browse and press Enter key, and your browser will be redirected to Apple Music web player.
Step 3: Click "Sign In" button at the top right of the web player, and enter your Apple ID and password. The Apple ID should be associated with your Apple Music subscription.
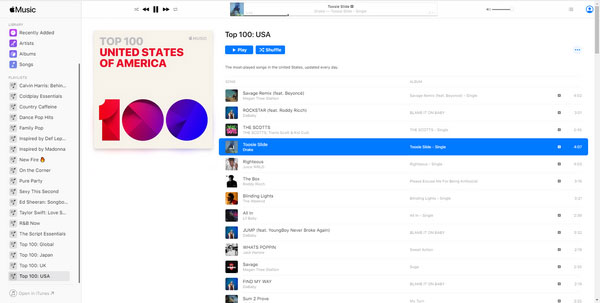
Step 4: Go to your music library and start to play Apple Music songs, albums and playlists on your Chromebook.
Notes:
- If Apple Music redirects you unexpectedly, check browser extensions or try an Incognito/Guest window.
- If audio stutters, switch to a lower quality in the player (if available) or check your Wi-Fi.
- School and corporate networks sometimes block streaming sites, if the web player is blocked, try the Android app (if supported) or offline playback via converted files.
How to Play Apple Music on Chromebook with Apple Music Android App
Many Chromebooks support Android apps via the Google Play Store. When available, the Apple Music Android app offers a native experience (offline downloads, mobile UI, and local caching). Note: not all Chromebook models include Google Play support; check your device settings first. The app behaves like the Android version, which may run fullscreen or in phone-mode depending on the Chromebook.
Step 1: On your Chromebook, open Google Play Store or visit the Google Play store on a web browser.
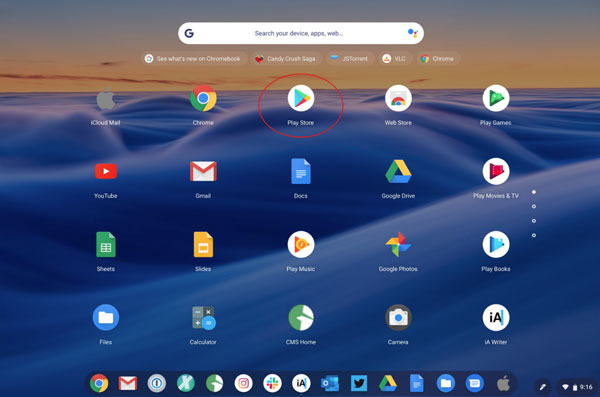
Step 2: Search Apple Music and click Install button in the result to install Apple Music Android app.
Step 3: Swipe up from the bottom of your screen to the top. If you get All Apps, tap it.
Step 4: Tap Apple Music app to launch it and click "Sign In" button to enter your Apple ID and password.
Step 5: Now start playing Apple Music songs on your Apple Music Android App.
Notes:
If you don’t see Google Play in Settings → Apps, your Chromebook model may not support Android apps. Check manufacturer docs or Chrome OS settings.
Play Apple Music Songs on Chromebook via USB Drive or Google Drive
If you need offline playback, limited network access, or your Chromebook lacks Play Store support, converting Apple Music files to standard audio formats (MP3/M4A/WAV) is a practical solution. After conversion you can copy files to a USB stick or upload them to Google Drive and play locally using the Files app or your preferred media player. Always use conversion tools responsibly and follow local laws and service terms.
1. Convert Apple Music to Chromebook-friendly files
TuneMobie Apple Music Converter can convert Apple Music songs to Chromebook supported audio formats like MP3, M4A, WAV, etc. with a built-in web player on Windows or macOS. It comes with an easy-to-use interface and 20X faster conversion speed, provides flexible output options and high-quality output files. Let's check the wonderful features below.
- Convert Apple Music songs, albums & playlists to MP3, M4A, WAV.
- Built-in Apple Music web player for batch conversion (Windows/macOS).
- Preserve metadata (title, artist, album art, track number).
- Bulk rename and folder sorting (by artist/album).
- Adjustable bitrate and high-speed conversion (multi-threading).
Important legal note: Converted files should be used for personal backup/offline playback only. Follow Apple’s terms of service and local copyright law.
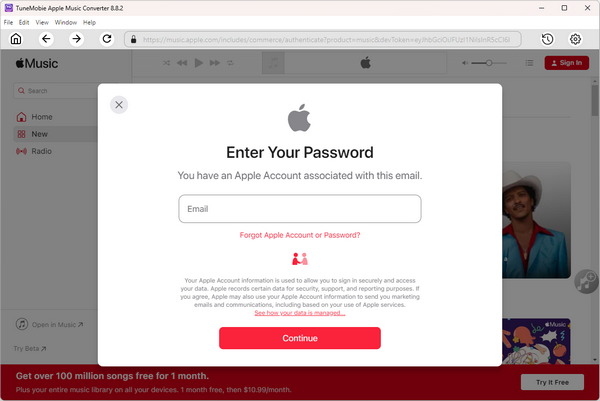
Step 1. Launch converter on Windows or macOS and sign in to the built-in Apple Music web player.
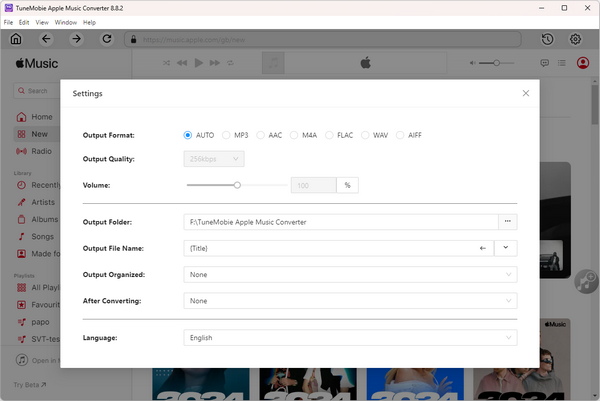
Step 2. Choose output format (MP3/M4A/WAV) in settings — 256kbps M4A is recommended for quality.
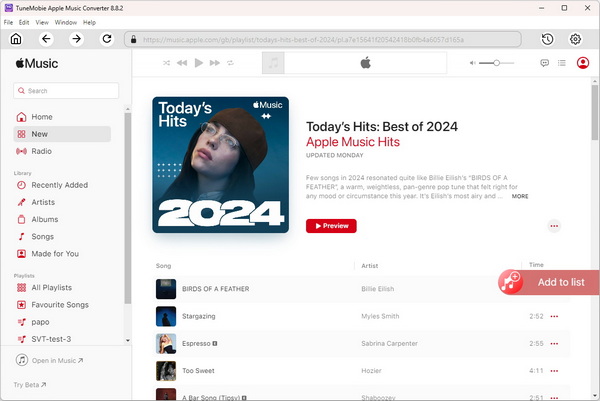
Step 3. Open the album/playlist in the web player and add to conversion list.
Step 4. Browse your Apple Music library, open an album or playlist, and Click "Add to list" button to add all the songs in the album/playlist to conversion list.
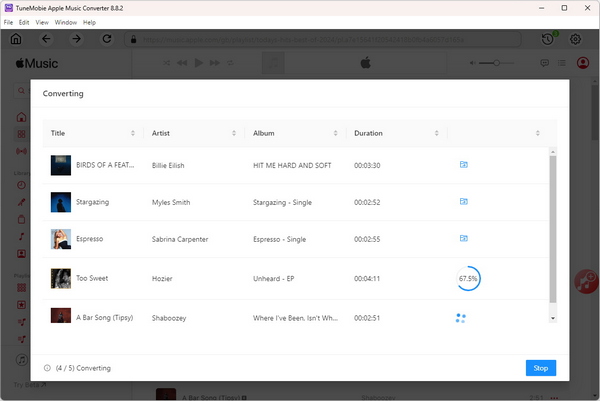
Step 5. Click Convert to start converting Apple Music songs to MP3, M4A or WAV. With 20X faster conversion speed, the conversion will be done in a short time.
Step 6. Copy converted files to a FAT32/exFAT USB drive (recommended) or upload them to Google Drive. (Chrome OS supports FAT32/exFAT and many common formats; use FAT32/exFAT for best cross-platform compatibility.)
2. Transfer Apple Music to Chromebook
After conversion, you can use USB drive or Google drive to make the converted Apple Music songs available on your Chromebook. No matter which way you use, there are some notes you may pay attention to.
1. Play Apple Music Songs on Chromebook via USB Drive
Chromebook allows you to access files on connected external devices with FAT (FAT16, FAT32, exFAT), HFS+ (read-only on journaled HFS+), ISO9660 (read-only), MTP, NTFS and UDF (read-only). It's recommended to format your USB drive to FAT32 or exFAT file system, which allows to both read and write the files on Windows, macOS and Chromebook.
Step 1: Prepare a pre-formatted USB drive and connect the USB drive to your Windows or macOS computer.
Step 2: Copy converted Apple Music songs from the output folder of TuneMobie Apple Music Converter and paste in your USB drive.
Step 3: After copying, disconnect the USB drive from your Windows or macOS computer and insert it into the USB port on your Chromebook which you have signed in.
Step 4: In the corner of your screen, select the "Launcher".
Step 5: Browse your music files from the USB drive and choose one or multiple files.
Step 6: Click "Open" and the selected songs will be displayed as a playlist in the Gallery app. Now you can start playing converted Apple Music songs on your Chromebook.
2. Play Apple Music Songs on Chromebook via Google Drive
You can also upload the converted Apple Music songs on your Windows or macOS computer, and then play the songs on Chromebook on the web.
Step 1: On the Windows or macOS computer where you have converted the Apple Music songs, launch a browser lik Chrome, Firefox, Microsoft Edge, ect., enter the URL of Google Drive: https://drive.google.com/. Log in your Google account if you haven't logged in.
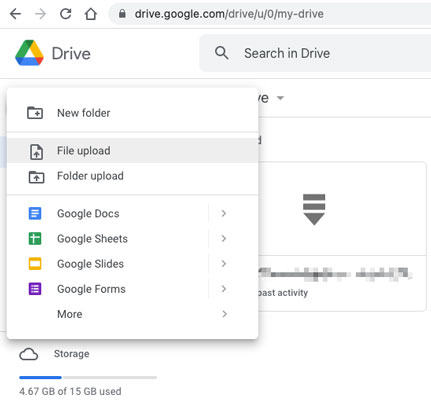
Step 2: Click the "New" button.
Step 3: You will see a popup menu. Click "File upload" to choose select songs or click "Folder upload" to choose the folder where the converted Apple Music songs are saved.
Step 4: Click "Upload" button to start uploading the songs.
Step 5: Now, you can switch to your Chromebook, log in your account and access to Google drive, then start playing the Apple Music songs on the web.
If necessary, you can use the "Files" app to make the converted Apple Music songs available offline, which help you to play the converted Apple Music songs when your Chromebook is not connected to the internet.
FAQ on Playing Apple Music on Chromebook
1. Do all Chromebooks support the Apple Music Android app?
No. Only Chromebooks with Google Play Store support can install the Android app. Check Settings → Apps → Google Play Store to confirm.
2. Which audio format should I choose for the best quality on Chromebook?
Use 256kbps M4A or 320kbps MP3 for a good balance of quality and file size. WAV is lossless but much larger.
3. Is converting Apple Music legal?
Laws vary by country. Only convert files for personal use and comply with Apple’s terms and local copyright law. Include a short legal reminder on your product page.
Bottom line
Now you know how to play Apple Music songs on Chromebook in different ways. You can play Apple Music songs on Chromebook directly via Apple Music web player or Android app, or you can convert Apple Music songs to MP3/M4A/WAV on Windows or macOS first, then play them via USB drive or Google drive.
If you want to play Apple Music songs on Chromebook without an internet connection, then TuneMobie Apple Music Converter and a USB drive is the best solution. The converter is the best solution to help you enjoy Apple Music songs on Chromebook after you cancel the subscription. If you have a Windows or Mac computer, a valid Apple Music subscription and a Chromebook, do not hesitate to download the free trial version to have a try now.