- Part 1. Why Can't I Import Apple Music into GarageBand?
- Part 2. Best Solution: Convert Apple Music to MP3
- Part 3. How to Add Apple Music to GarageBand on Mac/iPhone/iPad
- Part 4. Tips: Use GarageBand to Make A New Song from Existing Song
Why Can't I Import Apple Music into GarageBand?
![]()
Apple Music tracks are protected by FairPlay DRM (Digital Rights Management), which means they can only be played within authorized Apple apps like iTunes or the Apple Music app. Even if you download a song for offline listening, it’s still encrypted and tied to your Apple ID.
GarageBand requires standard audio formats like MP3, WAV, or AAC without DRM. Since Apple Music streams and downloads are in protected M4P format, they can’t be added or edited in GarageBand directly. Attempting to drag these files into your project will either fail or result in an unplayable track.
| Platform | Supported Audio Format |
|---|---|
| GarageBand | AAC, AIFF, Apple Loops, MP3, and WAV |
| Apple Music | Protected M4P |
| iTunes Songs | Unprotected AAC |
| TuneMobie Apple Music Converter | MP3, AAC, FLAC, M4A, and M4B |
To use Apple Music in GarageBand, you need to remove the DRM and convert the files into a compatible format. That’s where tools like TuneMobie Apple Music Converter come in handy, letting you convert Apple Music tracks to MP3, WAV, or AAC while preserving original quality and metadata.
Best Solution: Convert Apple Music to MP3
Since Apple Music tracks are protected by DRM, the most effective way to use them in GarageBand is to convert them into a standard audio format. MP3 is the most compatible format for GarageBand projects, allowing you to freely edit, mix, and apply effects without any restrictions. One of the easiest and most reliable tools for this is TuneMobie Apple Music Converter.
Why Choose TuneMobie Apple Music Converter?
TuneMobie Apple Music Converter is a professional desktop tool designed specifically to remove DRM from Apple Music legally while converting tracks to formats like MP3, WAV, or AAC. Some of its key features include:
- High-Quality Conversion: Maintain original lossless audio, high-resolution lossless tracks, and even Dolby Atmos quality, ensuring your music sounds just as intended.
- Multiple Format Support: Export music to MP3, WAV, or AAC, all compatible with GarageBand.
- Fast Conversion Speed: Batch conversion allows multiple songs or playlists to be processed at once.
- Metadata Preservation: Keeps song title, artist, album artwork, and other metadata intact.
- User-Friendly Interface: Simple drag-and-drop design, making it accessible even for beginners.
Step 1. Download and Install TuneMobie Apple Music Converter
Download TuneMobie Apple Music Converter according to your system. Follow the installation instructions and launch the program.
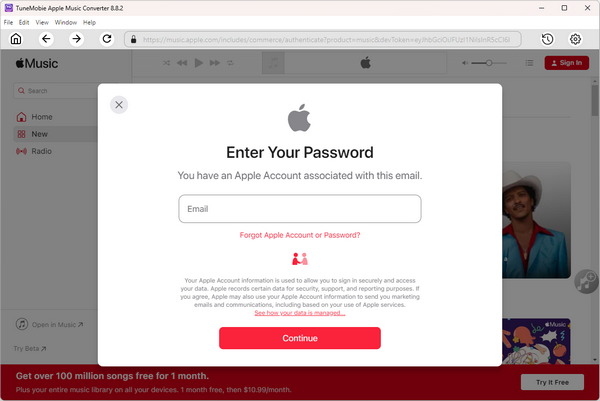
Step 2. Sign in to Your Apple Music Account
Open the program, and it will automatically detect your Apple Music library. Make sure you are signed in with the Apple ID that has access to your Apple Music subscription.
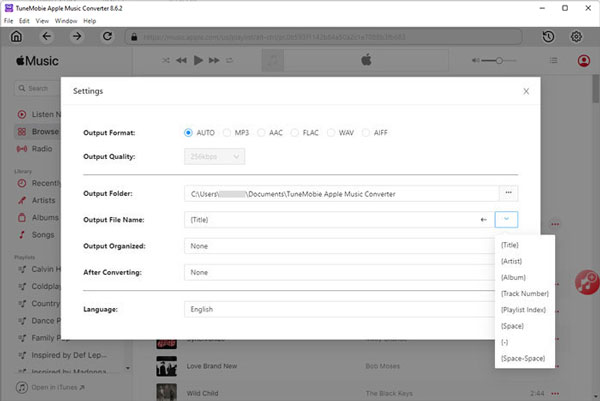
Step 3. Output Format and Quality Settings
Click the Settings option to open the Settings panel. Here you can select the output format (MP3, AAC, M4A, WAV, AIFF), output quality up to 320kbps, output folder, and more.
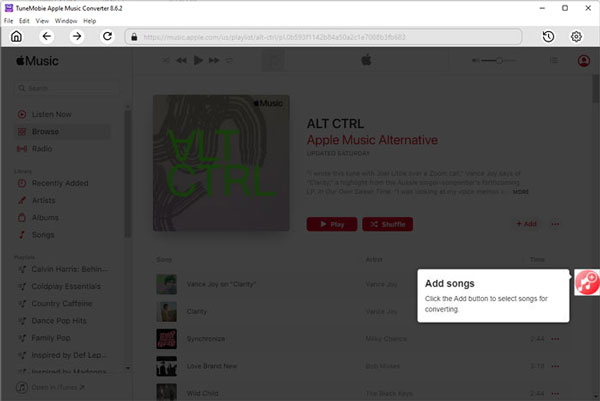
Setp 4. Apple Music Tracks
Browse your library directly within the app. You can select individual songs, entire albums, or playlists you want to import into GarageBand. Click Add Songs to start analyzing the music info.
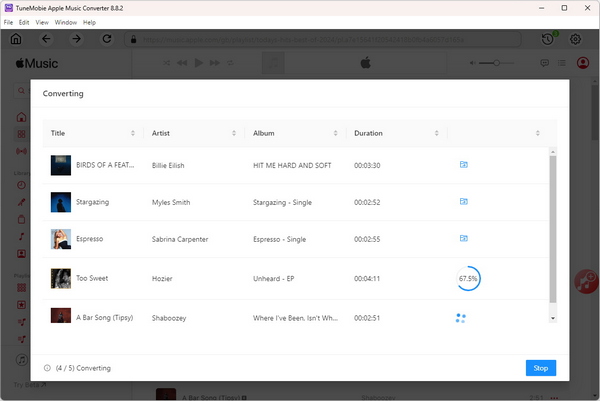
Step 5. Start Conversion
After analysis, you can preview the music info. Click the Convert button to start the DRM removal and format conversion. TuneMobie Apple Music Converter supports batch conversion, so you can process multiple songs simultaneously.
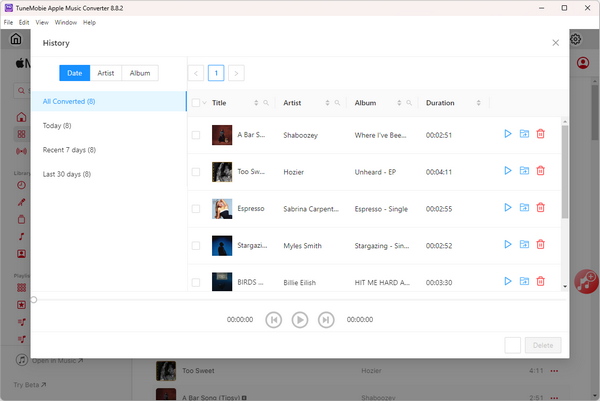
Step 6. Locate Converted Files
Once the conversion is complete, navigate to the output folder, or click the History button to access the converted music. You will now have DRM-free MP3 files ready to import into GarageBand.
How to Add Apple Music to GarageBand on Mac/iPhone/iPad
Now that your Apple Music files are stored on your computer and converted into GarageBand-compatible formats, you can easily use them in your projects. Whether you’re working on a Mac, iPhone, or iPad, importing your favorite Apple Music tracks is simple and straightforward. Below is a step-by-step guide to help you add songs from Apple Music into GarageBand on all your devices.
How to Add Music from Apple Music to GarageBand on Mac
Adding Apple Music to GarageBand on Mac is straightforward once your tracks are converted to a compatible format like MP3 or M4A. Here’s how to do it:
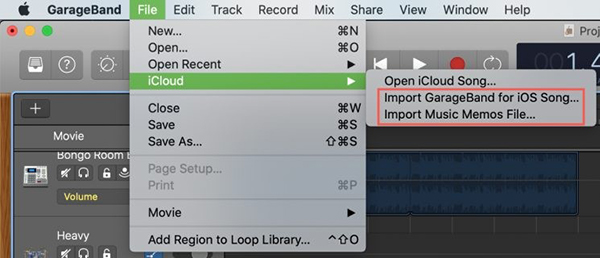
Step 1: Launch GarageBand on your Mac to open its main screen.
Step 2: From the top menu, click File > iCloud. You can then choose either Import GarageBand for iOS or Import Music Memos File depending on your file type.
Step 3: Select your unprotected Apple Music tracks and add them to GarageBand.
Note:
- Import Music Memos Files works only with Apple Music M4A files.
- For MP3 files, locate the folder containing your converted Apple Music tracks (e.g., from TuneMobie Apple Music Converter) in Finder, then drag and drop them directly onto GarageBand’s editing screen.
How to Import Apple Music to GarageBand on iPhone/iPad
GarageBand mobile apps work on both iPhone and iPad. To use Apple Music tracks in GarageBand on iOS devices, you need to sync them to your device first:
Step 1: Open iTunes on your Mac, then go to Menu Bar > File > Add File to Library to upload unprotected Apple Music tracks. Using TuneMobie Apple Music Converter ensures your Apple Music files are DRM-free and fully compatible with iTunes and GarageBand.
Step 2: Turn on iCloud Music Library by clicking Edit > Preferences > General tab. Also, make sure the iCloud Music Library option is enabled on your iPhone or iPad. This lets your songs appear on all Apple devices.
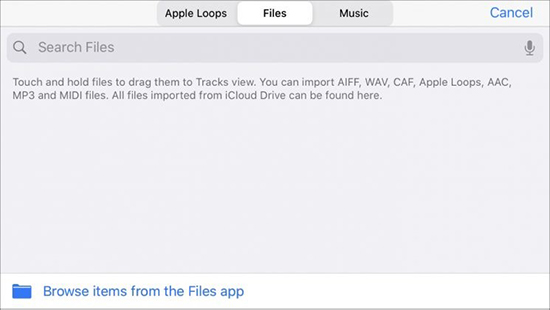
Step 3: Launch GarageBand on your iPhone or iPad and tap the Loop icon at the top right.
Step 4: Tap Files or Music, then browse and add your Apple Music tracks to GarageBand. Once imported, you can edit, remix, or add effects freely.
Tips: Use GarageBand to Make A New Song from Existing Song
When talking audio mixing application on macOS, GarageBand may be the first one that comes to your mind. It's developed by Apple and completely free for both macOS and iOS users. GarageBand comes with a complete sound library which includes instruments, presets for guitar and voice, and an incredible selection of session drummers and percussionists. It's a professional music creation tool yet still easy-to-use. Even novice can easily master the skills of basic music creation.
If you are a DJ, a tuner or a sound mixer and you are using macOS, you may be familiar with GarageBand. However, if you are a music lover and have an interest in basic music creation and you are using macOS or iPhone/iPad, GarageBand is also an good choice. According to Apple official website, GarageBand allows you to mix a new song from existing local music files in MP3, M4A, WAV, AIFF, CAF or Apple Lossless format. MIDI files are also supported natively.
If you want to mix a new song from local music file, you can simply follow the steps below.
Launch GarageBand and you will see "choose a project" dialog. If it's your first run, GarageBand will ask you to create an empty project by default. Click "Empty Project" and click "Choose" button at the bottom right.
Conclusion
Adding Apple Music to GarageBand doesn’t have to be complicated. By converting your tracks into GarageBand-compatible formats like MP3 or M4A, you can freely edit, remix, and enhance your music projects on Mac, iPhone, or iPad. TuneMobie Apple Music Converter makes this process effortless by removing DRM, preserving high-quality audio, and keeping all metadata intact. With your Apple Music library fully accessible, you can focus on creating without limitations and take your GarageBand projects to the next level.