- Part 1. How to Play Apple Music on HomePod via iPhone and Siri
- Part 2: How to Play Apple Music Songs with HomePod on Windows, Mac, iPhone & iPad
- Part 3: TuneMobie Apple Music Converter: Keep Playing Your Favorite Apple Music Songs
- Part 4: How to Convert Apple Music Songs to MP3/M4A and Keep Playing with Homepod
How to Play Apple Music on HomePod via iPhone and Siri
Setting up HomePod with your iPhone is the fastest way to start listening. Once set up, Siri can play songs, playlists, genres, and mood-based mixes with simple voice commands. You’ll also be able to manage playback (volume, skip, repeat), control smart home devices, and hand off audio from your iPhone to HomePod. The Home app keeps HomePod settings, music preferences, and personal requests centralized.
1. Quick setup: Power on & pair HomePod with iPhone
Step 1. Power on HomePod, place HomePod on a stable surface and plug it in. You’ll hear a chime and see a pulsing white light on top when it’s ready for setup.
Step 2. Unlock and hold your iPhone near HomePod — the iPhone will show a “Set Up” card; tap Set Up and follow prompts.
Step 3. Choose room, enable Personal Requests (optional), follow the on-screen prompts to assign the HomePod to a room and enable Personal Requests if you want Siri to read messages, set reminders, etc. Sign in with your Apple ID when asked.
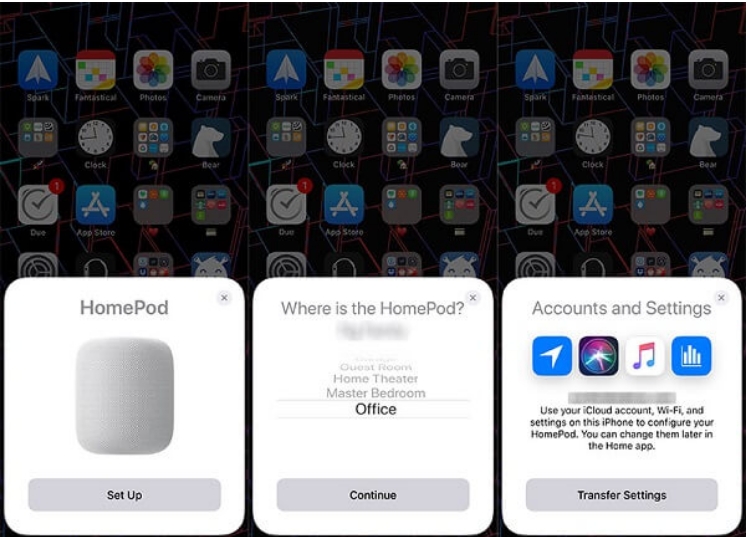
Step 4. Finish setup, the process finishes in a few seconds; Siri will greet you and suggest things to try.
Step 5. Install Home app & enable Hey Siri, make sure the Home app is on your iPhone and Hey Siri is enabled in HomePod settings (if not enabled during setup). This ensures voice control works from anywhere in the room.
2. Use Siri to play Apple Music on HomePod
Once setup is complete, use voice commands like:
“Hey Siri, play \[song name].”
“Hey Siri, play my \[playlist name] playlist.”
“Hey Siri, play some chill music.”
“Hey Siri, play the top songs from 1998.”
“Hey Siri, play the best music for a party.”
“Hey Siri, add this to my library.”
3. Playback controls & other useful Siri commands
“Hey Siri, raise the volume.” / “Hey Siri, set the volume to 50%.”
“Hey Siri, skip this song.” / “Hey Siri, previous.”
“Hey Siri, turn on repeat.”
“Hey Siri, I like this song.” / “Hey Siri, I dislike this.”
“Hey Siri, who sings this?”
These let you control playback without touching your device. ([Apple Support][4])
How to Play Apple Music Songs with HomePod on Windows, Mac, iPhone & iPad
If you use Apple Music across devices, HomePod can play music streamed directly via Apple Music or receive audio from other devices through AirPlay. That makes it flexible: stream from a Mac or iTunes on Windows, hand off audio from an iPhone, or ask Siri to start playback. Below are clear steps for each platform. ([Apple Support][5])
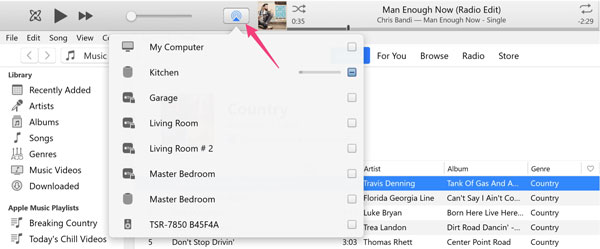
1. How to Play Apple Music Songs with HomePod on Windows
Step 1: Make sure you have installed iTunes and latest version is recommended. Launch iTunes and sign in iTunes with your Apple ID which is associated with your Apple Music subscription.
Step 2: Play your favorite Apple Music songs or other songs from iTunes Store or external sources.
Step 3: Click the AirPlay button at the top of the iTunes window, then select the checkbox next to HomePod. Whatever song you were playing in iTunes on your computer now plays on HomePod too.
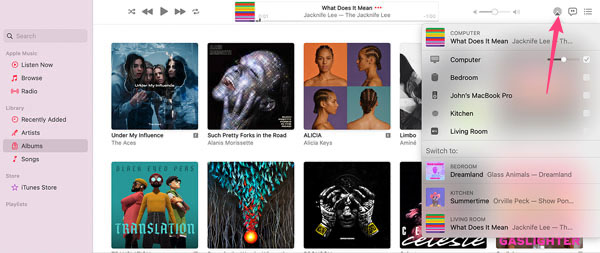
2. How to Play Apple Music Songs with Homepod on Mac
Step 1: Launch Music app and sign in your Apple ID which is associated with your Apple Music subscription.
Step 2: Play any songs including Apple Music songs in your music library.
Step 3: Click the AirPlay button at the right top of the Music aa, then select the checkbox next to HomePod. NOw the song which were playing in Music app on your Mac plays on HomePod too.
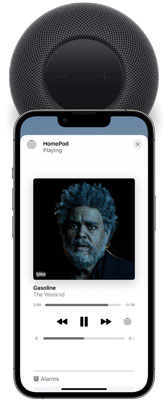
3. How to Play Apple Music Songs with Homepod on iPhone/iPad
Step 1: On iPhone, go to Settings > Bluetooth, turn on Bluetooth. Please note that Bluetooth must be turned on to hand off audio.
Step 2: On iPhone, go to Settings > General > AirPlay & Handoff, then make sure "Transfer to HomePod" is turned on.
Step 3: Hold your iPhone near the top of HomePod.
Step 4: Play any songs including Apple Music songs in your Music app, and the song will be played on HomePod.
On iPhone or iPad, you can also play Apple Music songs on HomePod using Control Center. Swipe down from the top-right edge if you are using an iPhone with Face ID or an iPad, or swipe up from the bottom to open Control Center, then tap the audio card, tap AirPlay button and select one or more HomePod speakers.
Note: AirPlay works with many apps. If an app is not natively supported by Siri/HomePod, AirPlay will stream audio from your device to HomePod automatically.
How to Play Apple Music on HomePod without a Subscription
If you’ve curated playlists on Apple Music but plan to cancel your subscription, you can still keep playable files for local use. TuneMobie Apple Music Converter converts Apple Music tracks into standard, HomePod-compatible formats (M4A, MP3, WAV, AIFF). After conversion, import the files into your Music/iTunes library and sync them to your iPhone (or use iCloud Music Library) so HomePod can play them via your account or AirPlay. Below is a concise feature list and step-by-step conversion guide.
- Convert Apple Music songs to MP3, M4A, WAV or AIFF (HomePod supports M4A, MP3, WAV, AIFF).
- Batch conversion through a built-in web player — no need to use iTunes or Music app during conversion.
- Preserve metadata: title, album, artist, track number and artwork.
- Bulk rename and folder organization (by artist, album, etc.).
- Adjustable bitrate for MP3/M4A to fit quality vs. file size needs.
- Up to 20x conversion speed on Windows and macOS; compatible with Intel and Apple silicon.
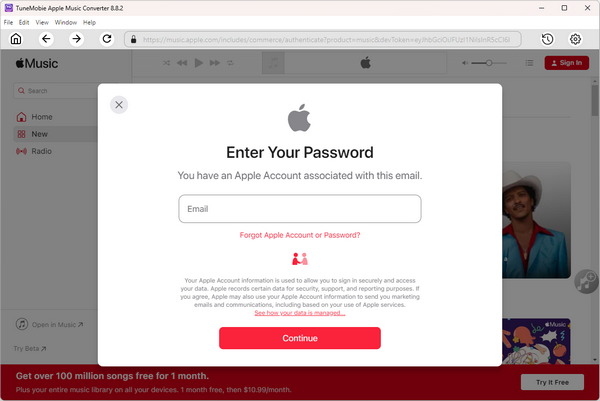
Step 1. Open TuneMobie Apple Music Converter and sign into the built-in Apple Music web player with your Apple ID.
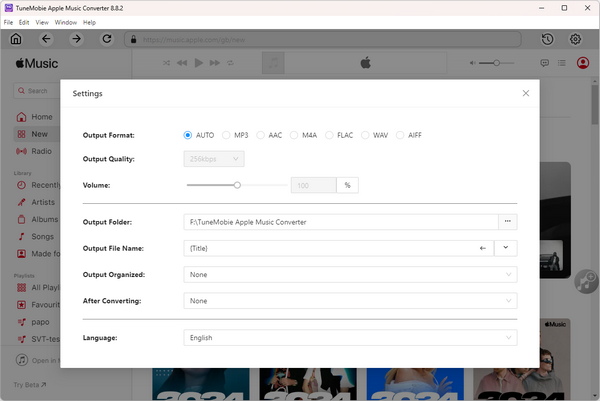
Step 2. Default is 256kbps M4A (compatible with HomePod). If you prefer, change to MP3, WAV, or AIFF in Settings. (Note: FLAC is not natively supported by HomePod.)
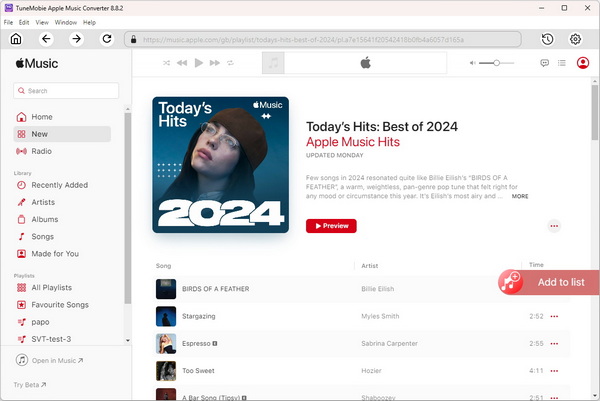
Step 3. In the built-in web player, open the album or playlist you want to convert. Click Add to list (or the equivalent) to queue all songs from that album/playlist.
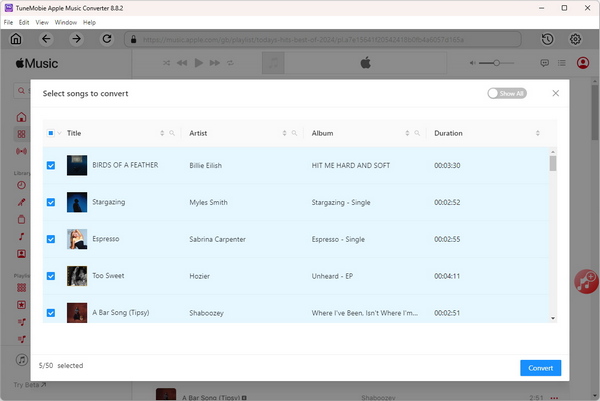
Step 4. All songs are checked by default; uncheck any you don’t want to convert. Click Convert. Conversion completes quickly thanks to multi-threaded performance.
Step 5. Import converted files into Music/iTunes. For Windows users open iTunes → File > Add File to Library (or Add Folder) and import the converted files. For macOS users, open Music → File > Import.
Then use iCloud Music Library (Sync Library) or manual sync (Finder/iTunes) to get the tracks onto your iPhone/iPad. After syncing, HomePod can play them using the linked Apple ID or via AirPlay.
Important note: Use TuneMobie according to local laws and service terms. Converted files should be for personal use only.
FAQ on Playing Apple Music on HomePod
1. Can HomePod play music from Spotify or other services?
HomePod can play third-party services by using AirPlay from an iPhone/iPad or by adding a supported music service in the Home app (default music service setting). Siri’s default playback uses the selected default music service unless you specify the service in the voice command.
2. What does the pulsing white light on HomePod mean?
A continuous pulsing white light indicates HomePod is ready for setup. A spinning white light indicates it’s turning on or updating.
3. Can I use HomePod with Windows?
Yes, play music in iTunes on Windows and use the AirPlay button in iTunes to stream to HomePod.
Bottom line
Are you using one or multiple HomePods? If yes, probably you have known how to use HomePod to play Apple Music songs on Windows, Mac, iPhone or iPad. If you're considering switching music services and want to keep listening to the Apple Music songs you spent time picking after canceling your subscription, then TuneMobie Apple Music Converter will be a good choice.