- Part 1: Why Do People Need to Convert Apple Music to MP3?
- Part 2. Best Way to Convert Apple Music to MP3(Lossless & 10X Faster)
- Part 3: Convert iTunes (Purchased) Songs and Apple Music with iTunes/Music App
- Part 4: How to Record Apple Music to MP3 with Audacity?
- Part 5: How to Convert Apple Music to MP3 with Online Apple Music Downloader
Why Do People Need to Convert Apple Music to MP3?

Apple Music files are protected and meant to be played inside Apple’s ecosystem (Apple Music app, web player). That’s great for streaming, but it causes friction if you want to: use tracks in a video editor, burn an audio CD, play music on legacy MP3 players, or keep songs after canceling the subscription. Converting to MP3 solves compatibility and portability issues while letting you archive and use your music more flexibly.
Common reasons people convert Apple Music to MP3
- Play on legacy devices: iPod Nano/Shuffle, old car stereos, Sony Walkman, basic MP3 players.
- Use as BGM for video editing: iMovie, Premiere, Final Cut, mobile editing apps.
- Burn MP3 or audio CDs for cars and older players.
- Store in external storage or cloud (USB, SD, Google Drive, OneDrive).
- Import into DJ or audio apps (Serato, GarageBand).
- Keep offline copies that remain playable after canceling Apple Music.
Part 2. Best Way to Convert Apple Music to MP3(Lossless & 10X Faster)
If you want speed, accuracy and preserved metadata, a dedicated Apple Music converter is the best choice. TuneMobie Apple Music Converter is built to convert Apple Music tracks, albums and playlists quickly while preserving ID3 tags and artwork. Unlike real-time recorders (which re-capture audio) or manual iTunes exports (which fail on protected tracks), TuneMobie captures the audio stream and metadata directly from a built-in Apple Music web player for batch conversion with minimal user steps.
- Convert Apple Music songs, albums and playlists to MP3, M4A, WAV, AIFF, FLAC.
- Built-in Apple Music web player: no iTunes/Music app dependency.
- Preserve full ID3 tags & metadata: title, artist, album, track number, artwork.
- Bulk rename & organize outputs by title, artist, album, track number, hyphen/space rules.
- Lossless handling: convert 256kbps AAC Apple Music to 320kbps MP3 or 256kbps M4A with minimal quality loss.
- Up to 20X faster conversion on supported hardware (Windows/macOS).
- Batch conversion support (whole albums/playlists) and large library handling.
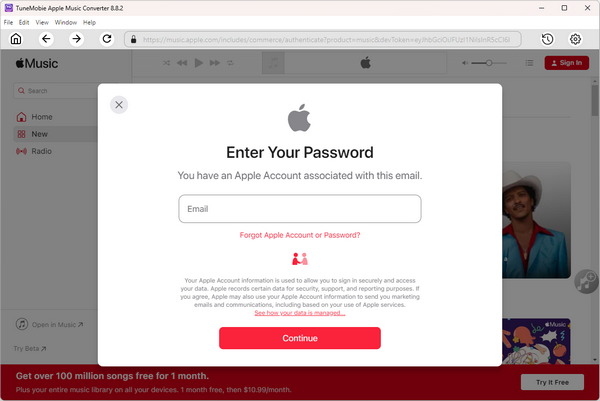
Step 1: Open TuneMobie Apple Music Converter. Use the built-in Apple Music web player and click Sign In (upper right). After sign-in, your Apple Music library and playlists appear in the left panel.
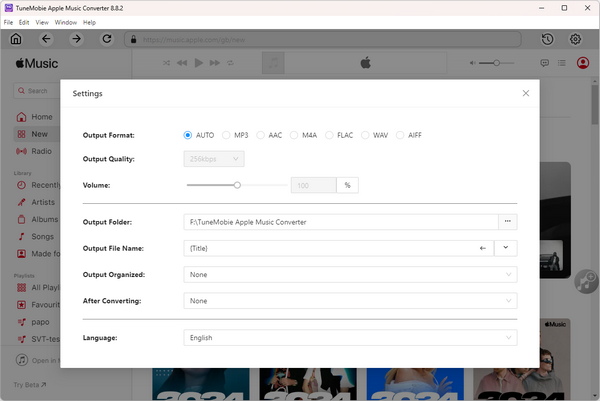
Step 2: Open Settings → select MP3 and choose bitrate (up to 320 kbps). Set output folder, rename and sorting rules, and any post-conversion action (e.g., open folder).
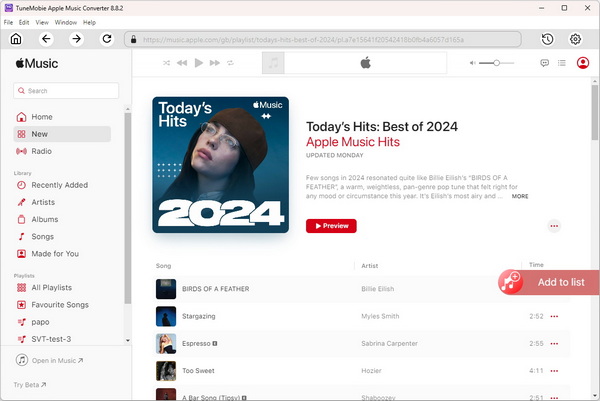
Step 3: Browse the built-in player to an album or playlist and open its detail page to list tracks. Click Add to list (center/right) to queue all songs. Alternatively select individual tracks.
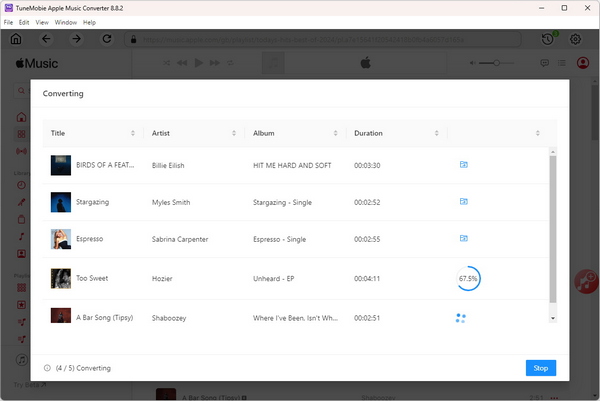
Step 4: Tracks are checked by default. Uncheck any you don’t want. Click Convert. TuneMobie captures the audio stream and ID3 metadata and creates MP3 files in the chosen folder. After conversion you can transfer files to devices, import into editors, burn to CD, or upload to cloud storage.
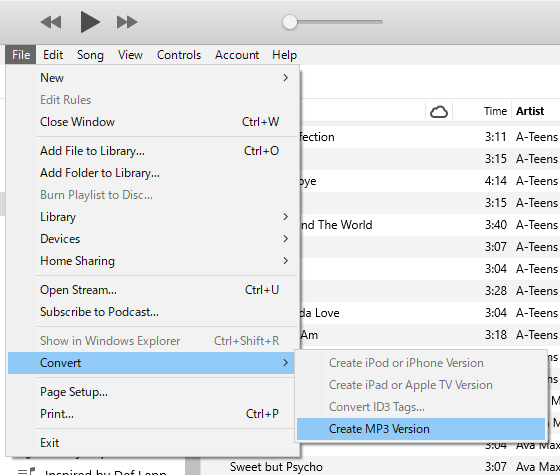
Part 3: Convert iTunes (Purchased) Songs and Apple Music with iTunes/Music App
iTunes and the Music app include conversion features, but they only work for unprotected files (purchased or DRM-free). Apple Music tracks, which are DRM-protected, cannot be converted this way. Use iTunes/Music app only when you know the files are non-protected purchases or your own local files.
Step 1: On Windows or macOS Mojave 10.14.6 or lower, launch iTunes first, then click menu "Edit" & "Preferences" & "General" tab.
Step 2: In "General" tab, click "Import Settings..." button.
Step 3: "Import Settings" dialog will be displayed. In order to convert iTunes songs and Apple Music to MP3, we need to choose "MP3 Encoder" from "Import Using" list.
Step 4: You can choose MP3 bitrate from preset values. Or select "Custom" then choose MP3 bitrate from a list with more options. You can choose 320kbps which is the best MP3 quality.
Step 5: After setting MP3 encoder and MP3 bitrate, click Library tab in top middle menu to open your song list, choose one or multiple songs you like in the library.
Step 6: To convert select songs to MP3, click menu "File" & "Convert" & "Create MP3 Version".
Pros:
- Built-in tool; no extra installation required.
- Reliable conversion for purchased, DRM-free iTunes files.
- Simple UI; familiar for many Apple users.
Cons:
- Cannot convert DRM-protected Apple Music tracks.
- Depends on local files; streaming library unsupported.
- Limited output options compared to dedicated converters.
- Conversion fails when files are protected DRM.
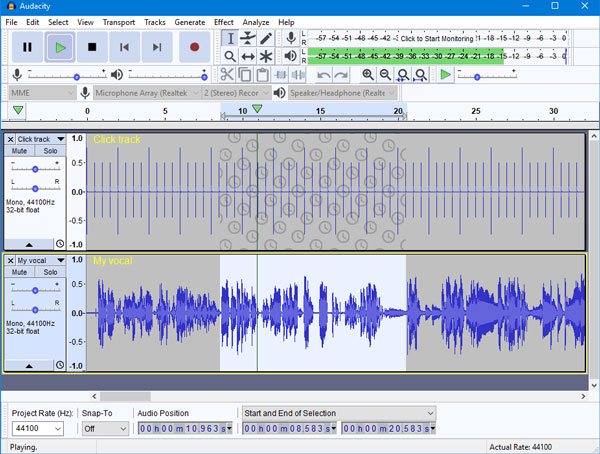
Part 4: How to Record Apple Music to MP3 with Audacity?
If you prefer a free approach you can record playback in real time using Audacity. This method records exactly what plays, but it's slow (1:1 time), requires manual splitting and tagging, and produces lower convenience for batch tasks. Audacity is useful for one-off captures or when no converter is available, but it's impractical for large collections.
Step 1: Download and install Audacity from its official site.
Step 2: Open Preferences → Audio Settings and select your recording device (loopback/system audio).
Step 3: Press Record, then play the Apple Music track in your player or web player.
Step 4: Stop recording when the song finishes, trim/split if needed, and Export → Export as MP3.
Pros:
- Free and open-source; no purchase required.
- Works across Windows, macOS and Linux systems.
- Records exactly what plays; captures live audio.
Cons:
- Real-time recording equals slow, time-consuming conversions.
- Requires manual splitting and tagging of tracks.
- Quality depends on system audio setup and drivers.
- No batch conversion; impractical for large libraries.
Part 5. How to Convert Apple Music to MP3 with Online Apple Music Downloader
There are online services that claim to convert Apple Music links into MP3 files. They can be convenient for single tracks, but quality, legality and reliability vary widely. Many such services pull audio from secondary sources (YouTube), impose limits, or lack proper metadata handling. Use these only with caution and be aware of the service's reliability and privacy policies.
Step 1: In Apple Music app or web player, copy the track/playlist link (Share → Copy Link).
Step 2: Paste the URL into the online downloader’s input field.
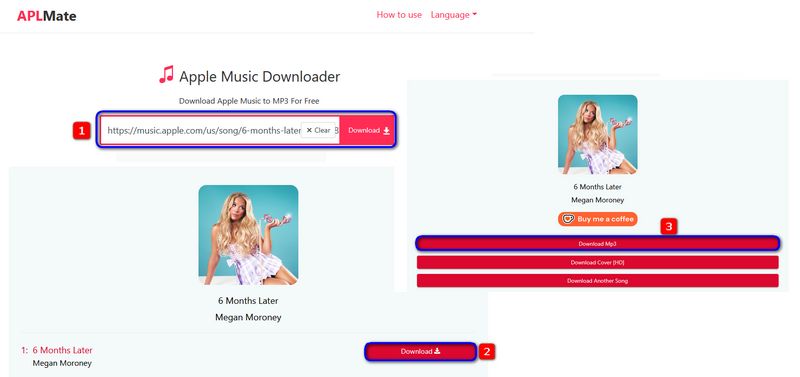
Step 3: Click Download and follow the site prompts to get an MP3.
Pros:
- Quick single-track downloads without installing software.
- Accessible from any device with web browser.
- Often free or low-cost for basic use.
Cons:
- Quality inconsistent; often sourced from YouTube streams.
- Limited downloads; capped per session or per day.
- Metadata and artwork frequently missing or incorrect.
- Legal and privacy risks depending on service.
Bottom line
Apple Music to MP3 conversion can't be done by iTunes or Music app, because the protected files are not allowed to convert by Apple. Audio recording software can be used to Apple Music to MP3 conversion, but it's inefficient and time-consuming, it's only suitable for recording one or several Apple Music songs. With TuneMobie Apple Music Converter, Apple Music to MP3 conversion has become much more easier. You can get it done by only a few clicks with less time and better quality.